A custom report printed from e-automate used as a delivery and acceptance form for equipment deliveries or pickups.
Jump to a specific section by clicking a link
Overview | Samples | Variables | Alert Functionality | OnDemand Report Filters | Best Practices & Tips | Related Alerts
Overview
Overview
This alert is a custom report that can be run from the reports console in e-automate to print a delivery and acceptance form for equipment deliveries or pickups. The report can be customized to have your acceptance terms and company logo. The form is populated by data from a service call in e-automate and contains all pertinent information the delivery driver needs to complete the delivery or pickup.
In order for the report to work for you, you do need to be creating service calls for each equipment delivery. Using e-automate’s dispatch console to stage and schedule your equipment deliveries/pickups is a best practice. (For details on how to set this up, see the details here.) This way, you can obtain signatures upon install and submit the form to your leasing company for funding.
Run Schedule: On-Demand
Type of Output: On-Demand Crystal Report
* * *
Sample
Sample
We can format and edit verbiage for you:
If you have ID815 (IFTTT) process it can pull in the sales order line item detail notes
* * *
Variables
Variables
This alert has no variables.
* * *
Alert Functionality
Alert Functionality
1. In order for accessories to populate on D&A, accessories must be linked and consumed under HOST.
2. The call type prints at the top right-hand side of the delivery ticket in bold letters so the truck drivers understand the transaction type they are dealing with (delivery and/or pickup).
The Signature block/text for deliveries can be different from that used for pickups, but the logic only works if your Call Type codes have either the word ‘Delivery’ or ‘Pickup’ in the call type description, so the report can recognize the different type of call and print the appropriate signature verbiage block.
3. The call types used for deliveries and pickups should have a category of IR - Install/Pickup so that they do not affect your service call statistics.
If you are using ID815 to automate your equipment orders, the Delivery & Acceptance form can pull in the related Sales Order for this equipment along with the sales order line detail note into the Comment section on the form
Pull from line item per below
* * *
OnDemand Report Filters
OnDemand Report Filters
You can filter the report to a specific service call number or date range. Use the advanced filter on the service calls to only print the calls marked as delivery or pickup.
* * *
Best Practices & Tips
Best Practices & Tips
Using the dispatch console to manage delivery and pickup calls:
**Following these guidelines will ensure that the delivery and pickup calls will not affect your field technician stats and service reports**
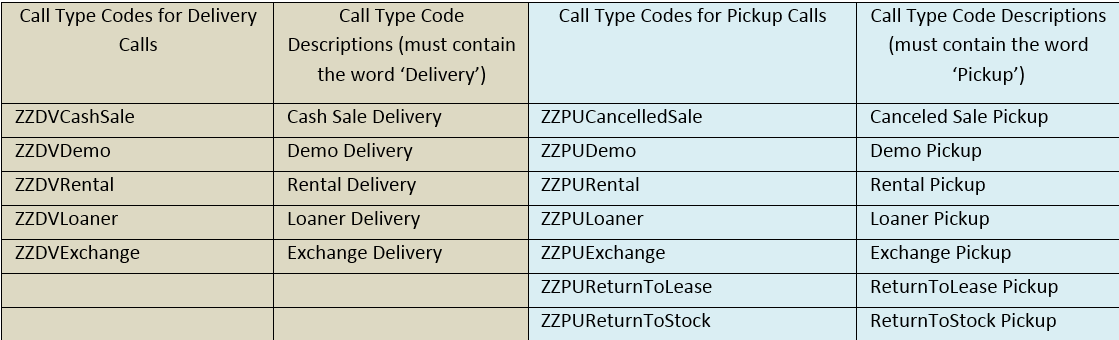
1. The best way to keep these calls from affecting stats is to exclude these delivery call types (and, where possible, CallType Category) by setting all your delivery call types to start with a fixed common character set (as shown below). For example, start all the call types with ‘ZZ’ so in your dispatch console, you can easily include/exclude all delivery calls by using the call type filter that does not contain ‘ZZ’.
2. The next control set is to use the first two characters to differentiate between a delivery call (‘DV’, for example) and a pickup call (‘PU’). Following this logic as an example, you would have the following call types set up as below (and all are assigned the CallType category of ‘IR’):
3. The next step is to create a technician record for your delivery trucks. You could have the actual drivers as the technician, or you could create a technician called ‘Truck1’, ‘Truck2’, etc. The crucial part here is the best practice to, once again, start each of these techs' "employee number" with a common couple of characters.
For example:
ZTUA - Truck unassigned, this is the technician assigned to calls that are not ready to be delivered yet.
ZTTruck1 / ZTTruck2 - When the equipment is ready for delivery, one of these technicians is assigned to the call, indicating the equipment is ready to be delivered. You can use the priority codes on the service calls to indicate the stop number for the delivery driver.
4. Next, you could use call service priority codes to establish the order the truck will deliver the equipment each day. If you're confident in the exact start time and the length of time for each delivery call, then you could use the Dispatch Console ‘Day View’ to reorder/assign start times for each truck's calls. We found that it can create more confusion with our reps instead of helping (you said you’d be there at 9:30 and it’s 11:30!). We only designate the ‘Stop’ number using a service priority code as below. These become the ‘order’ that the truck will make its stops for the day.
Priority 1 - First Stop
Priority 2 - Second Stop
* * *
Related Alerts
Related Alerts
None at this time.
* * *
Jobs
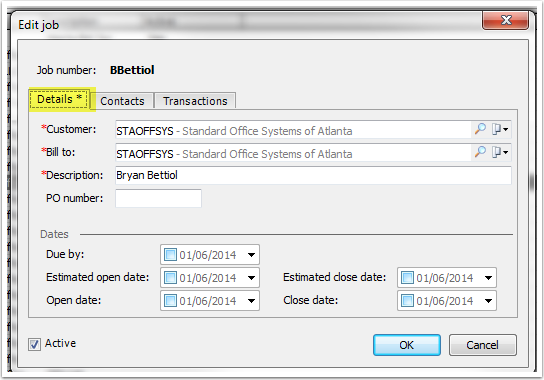
As of version 8.1, there is still no way to effectively associate a sales order to a specific service call for delivery tracking. So we use the Inventory Jobs feature of e-automate to help create a common thread between different modules. In the case of equipment deliveries and pickups, we need to communicate to the sales rep at different stages in the process of the delivery call, so our alerts/paperwork rely on you creating all your sales reps and sales admin people as ‘Contacts’ in e-automate for your company record. Then create a ‘Job’ in e-automate for each sales rep in which you associate the rep’s contact record to the job, and also their appropriate sales admin team member (if you have distinct admin person assigned to each rep). After you have created the rep and admin person as a contact for your company e-automate customer record. from e-automate main menu bar select "Tools," then "Jobs," then click the "New" button.
Setup the job as below. Remember to add the rep/admin contact records to the Contacts tab.

0 Comments