Financial Model Mapping app to facilitate mapping of your chart of accounts and employees to the Global model.
Jump to a specific section by clicking a link
Overview | Samples | Accessing App | App Functionality | Best Practices & Tips | Related Alerts
Overview
Overview
ID893 is a custom application we built to allow you to "map" your chart of accounts to the Global Model. The app also allows you to map your employees to the standard titles for the SBA/CDA model.
This enables you to run a report that will display your numbers based on the Global chart of accounts without having to change yours. This is a one-time exercise and will only need to be updated if you add additional accounts. Our process also allows for multiple "models" if you want your own customized version. We expect this one-time exercise to take less than half a day.
* * *
Sample
Sample
Financial Model Mapping:
Employee Mapping:
* * *
Accessing App
Accessing App
1. Access via URL: http://<webserver>:8888
(Replace <webserver> with the name of the server where the CEO Juice software is installed, the Juice box). Email us at help@ceojuice.com if you do not know the name.
2. For ECi hosted clients, please see THIS LINK on accessing your apps.
3. DO NOT USE INTERNET EXPLORER AS YOUR BROWSER.
4. Login using your ceojuice.com credentials. Missing needed permissions? Please use THIS LINK on how to set access.
There are two sections to the Financial Mapping app:
Please see ID709 for instructions on setting users' security access.
* * *
App Functionality
App Functionality
There are two sections to the Financial Mapping App: Financial Mapping | Employee Mapping
Financial Mapping
Financial Mapping
Steps:
Select the Model SBA2020 (SBA Dealers) or BM2019 (Bering McKinley Dealer) member.
We suggest sorting by Account Number and then filtering by whatever accounts you want to map 1st.
1. Adding Mapping Rule:
Active accounts appear first and are followed by inactive accounts:
2. Add Mapping Rule:
- Use All Depts (will not include transactions with no dept) or pick specific dept via "Add GL Depts 2.
- ALWAYS select ALL Branches
- ALWAYS select all divisions
3. Select the Division - this corresponds to the SBA Survey, for example, Imaging corresponds to equipment
4. Select Bucket
**The Bucket and Department MUST relate, for example, Equipment Bucket to Equipment Department (often the same)
5. Select Department
EXCEPTION: (1) Service Supplies Departments correspond to After Market (Sup + Svc) Bucket and (2) MNS Departments correspond to IT Products and IT Service Buckets
6. Select Account
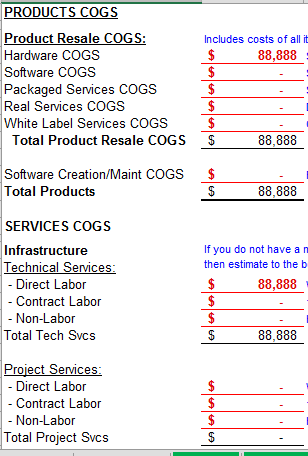
**We recommend printing out your list of available accounts to have alongside you as you map accounts (see below screen shot):
Print this page, accessed under Accounts at the top of the screen, to reference for Select Account mapping. This shows you a breakdown of all the accounts and what is generally placed in those accounts.:
7. Once mapped, you can see your mapping rules in place:
**(1) Be sure to add *Include trans with no dept at 100% if you choose to do so via Mapping Rule
Sample multiple mapping for one GL account, different departments allocated to different accounts:
******************************************************************************
Of special note:
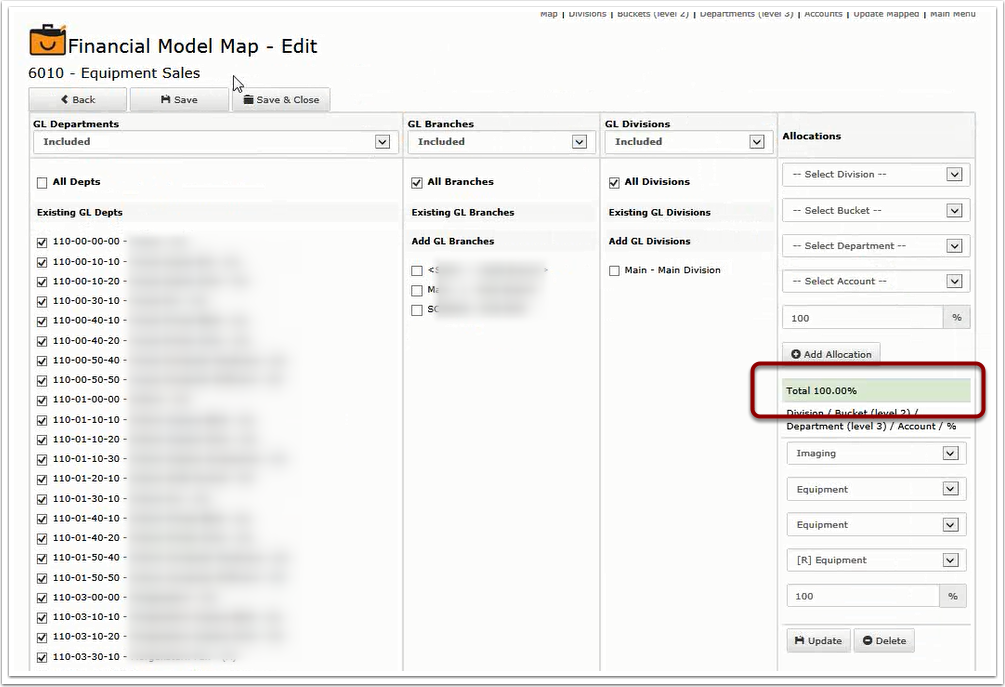
We give you the option to include or exclude all departments (1), GL Branches, and GL Divisions. Once you have your selection complete then choose where in the model the selection gets allocated to (2), then click Add Allocation (3).
To map one account to different departments with different allocations, do one complete mapping first to one department (or as many as you wish that are the same), choose save, then add additional mapping rules and map the next department with a different allocation.
Remember, if you exclude certain departments, you must FIRST go to Included and check All
Clone Mapping
For situations where you might have a set of revenue accounts that have a matching set of cost of goods accounts, we allow you to "clone" the mapping.
NOTE: CLONING COULD SAVE YOU A LOT OF TIME ON THIS PROJECT!
You can edit a mapping to make changes

Note that you can choose to allocate just a percentage, but if your total allocations do not add up to 100% then the results will be highlighted red.

It's also a good idea to refer directly to your current SBA Survey to assist with mapping, as in the example below, if you are unsure of what bucket to place a MNS account between product or services
******************************************************************************
8. When you are finished mapping or just want to see what the results look like, click the Update Mapped link and select Update Mapped Data:
Wait for the message to say update complete:
Once mapped, you will want to run ID900 to see how the results look. Details here.
Employee Mapping
Employee Mapping
1. In the menu options along the top right, you can click on Titles (1) to see the list of available titles or Classes (2) to see the list of available classes. You are not able to add or edit the titles or classes, as these are the ones set for use with the SBA/CDA models.
Titles are the job description for the employee, and classes are a departmental group - Service / Admin / Sales / Executive. Most of the employee-to-revenue metrics are to the ‘Class’ level and then to the functional level of Sales Manager/Rep or Serv Mgr/Rep.
2. To add an allocation for the employee, click on the plus sign next to the name (1). To edit the existing allocation, click on the pencil icon (2).
You need to assign each employee (1) their title (2), percent allocation to that position (3), start period (4), and end period (5). An allocation of 50% may apply if the person fulfills multiple roles or departments.
If an employee is 50% Field Tech and 50% Sales Rep, this would require two entries for this employee, one for a field tech and one for a sales rep:
* * *
Best Practices & Tips
Best Practices & Tips
1. Using the cloning feature can make the project go quicker.
2. It's a good idea to refer directly to your current SBA Survey to assist with mapping if you are unsure of what bucket to place an MNS account between product or services
3. You never want to change a person's title for the entire year if their position changed at some point during the year. You will need to have multiple entries for each position held in that year. We require this in order for historical headcounts to be consistent and accurate. The key is to not change people's titles as they move positions but to terminate the existing title as of the last month they were in that position and then create a new allocation for the employee going forward.

In the above example, the employee was a Field Tech from 01/2007 - 11/2015 and then, as of 12/2015, became a Sales Rep.
This would also apply when a tech moves from the 1-2 year title to the 3-4 year title. You would put an end period on the tech's 1-2yr title, then put the next month period as the start period for the 3-4yr title, and the 3-4yr title has no end date. The periods cannot overlap and exceed 100%, and the termination period is ‘thru’ the whole YYYYYMM period.
* * *
Related Alerts
Related Alerts
ID704 - Financial Model Power BI
ID900 - SBA Certification Guide
ID901 - Unmapped Accounts for Financial Benchmark Reporting
ID909/ID910 - Financial Benchmark Model
* * *
0 Comments